
Git-Fu Basics: White Belt
Writing code without a good code versioning system (CVS) is like heading into the jungle without a compass and a map. You will never really know where you are and where you have been. A good CVS belongs into every coder’s tool belt. And one of the most ubiquitous CVSs is git, which has originally been developed by Linus Torvalds for the maintenance of the Linux Kernel. In most organisations I have worked so far, git was the main tool except for SVN (which was often in the process of being replaced by git).
However, I was still often astonished how many problems people had when dealing with git — either because they came from a background where coding best practices weren’t widespread or because they simply did not care to read the documentation.
In the following, I will provide a quick introduction into git with a quick progress to more complicated topics. The introduction is structured into three “belts”:
The basic white belt
Mastering these three belts should give you a sufficient tool set for large majority of all the problems you will encounter. I will publish the subsequent articles one by one.
A git repo as a block chain
A git repository can be thought of as a “block chain” of commits. A commit contains basically a patch, a message, a link to the parent commit and a hash. The patch is the set of added (+) and deleted (-) lines. A hash is a big number that is created from all the information of a commit (i.e. the patch, the message and the parent commit’s hash). The idea is that in practice no commit has the same hash as any other commit. If you change any of the parts of a commit, the hash will change as well. So if you change something in the parent commit, this would also change the children’s commits as they depend on the parent. This is basically how a block chain works as well. The big difference is that in git you can (and should) have forks while for block chain this is discouraged as there should only be one history of transactions.

A sample git repo with the initial commit at the bottom and the newest commit at the top. The arrow indicates the link to the parent commit. The hash is the weird little string of characters.
So by keeping track of all your incremental changes and making sure that they cannot be changed without a trace, git creates a history of your code repository. This allows you to go back in time and see intermediate states of your work (as long as you have committed those intermediate states to the git repository).
A big advantage of git compared to some older CVS is that you can operate it in a very decentralized fashion. There is not a single source of truth but each repository contains the full history. They can be kept in synch by pushing and pulling the code changes from other repositories. De facto you still have often a single repo that acts as the golden source to which all relevant changes should be pushed if you want everybody to know about them.
Branches and tags
In principle, the hashes are the “names” of the commits and you can refer to any commit through its hash. However, this is rather cumbersome. Instead, each branch has usually a name attached to it that can be used to identify it. The name or (rather the associated ref) points to the last commit of the branch. As new commits are added to a branch, the ref is being updated as to point to the new commit.
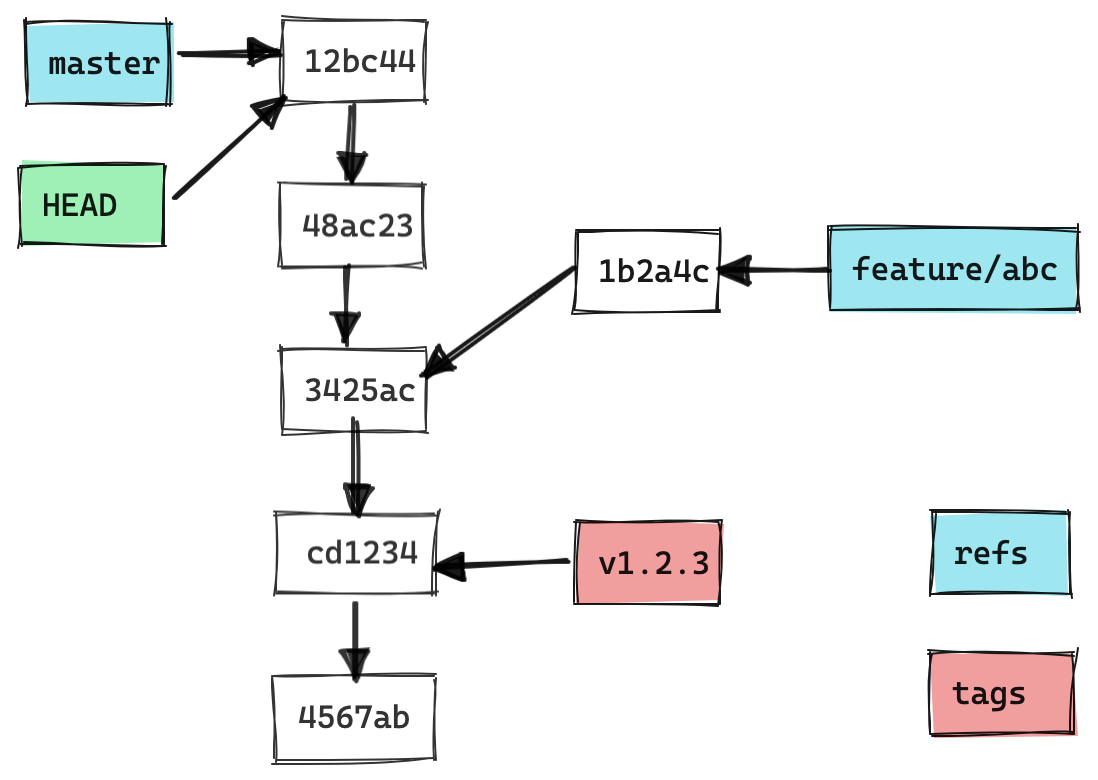
This git repo has two branches: master and feature/abc. It also has the tag v1.2.3. Only the hashes are shown for the commits.
There is a special branch called HEAD which always points to the currently checked out commit. In the example shown above there are two branches: master and feature/abc. Often the main branch is called master (or sometimes also develop). Any experimental work is often done on dedicated branches (e.g. here feature/abc) where it is tested and hardened before it gets merged back into the main (master) branch.
Tags can be used to mark certain commits and they usually don’t change. They can for example be used to tag a commit release. So in the example above this would have been release 1.2.3.
The four stages of a file in git
In a git repository, a file can be in one of four stages:
Untracked
Modified (working tree)
Staged (index) or
Committed
and there are various command to switch between them.
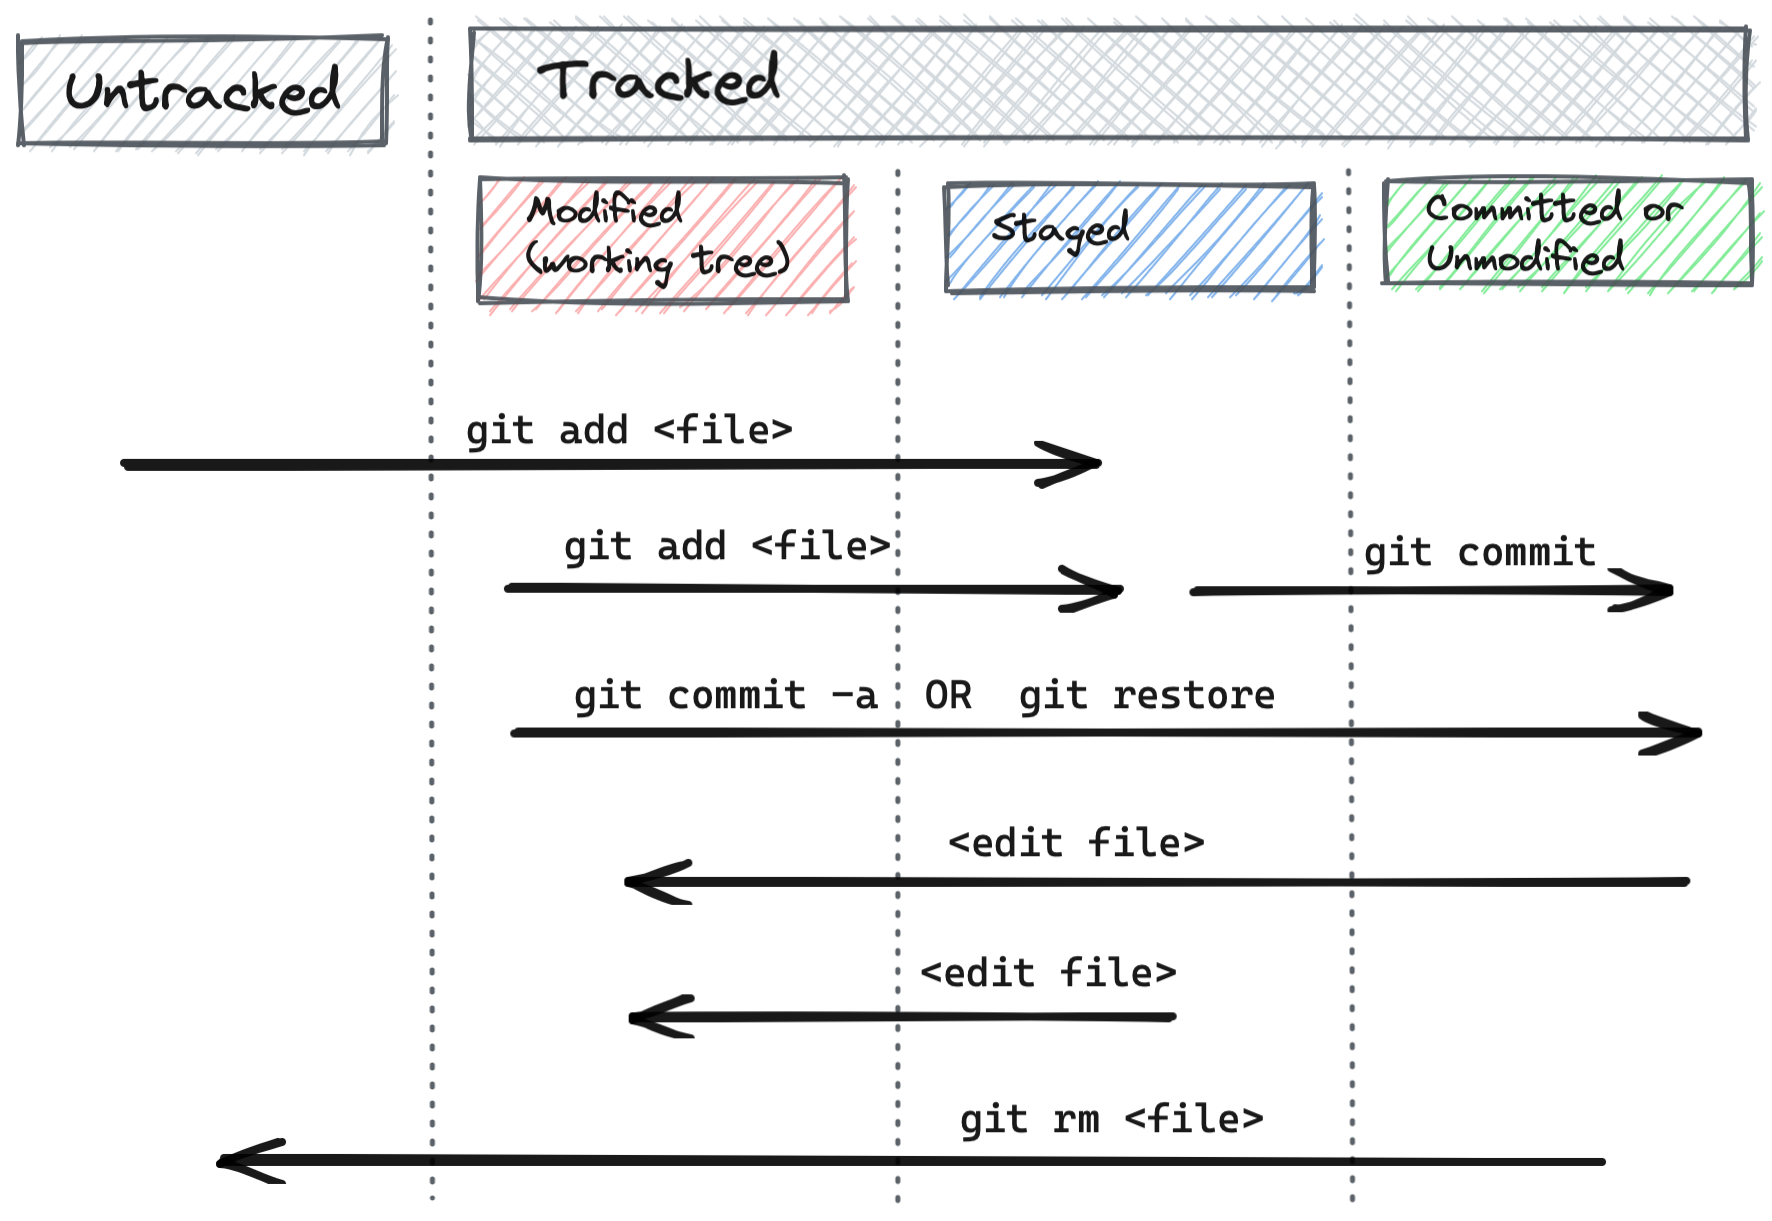
The four stages of a file in a git repository and the operations to change between them.
Any file starts as untracked. If it should stay untracked, add it to the gitignore file. Otherwise, add it to git with git add. The file becomes then staged and is added to the index. From here you can create a commit to add the file to a commit and fix its state in the git history.
As soon as you edit a file, it is flagged as modified. The set of modified files (or “what you see in the file browser”) is called the working tree. From here you can stage a file again with git add. Note that you can have three different versions of a file: committed, staged and modified. They are basically three different levels of confidence: committed is what you are really sure of, staged is what you are about to commit (but it is not yet fixed in the history) and modified is your current work in progress.
To remove a file again completely from git (and from the file system) use the git rm command.
The git command line interface
Many git newbies first encounter it through a graphical user interface (GUI) which often just sits on top of the usual git. As these tools are often not as powerful as the original command line interface (CLI) and since they often also not use the correct git terminology, many newbies are lost and cannot really look for help online or dive deeper into the internals of git.
Meanwhile, the original CLI is far more powerful and in my opinion informative than any obfuscating GUI. See below an example output of git status.

The output of git status on the CLI. It shows the various states in which a file can be and the various commands to move a file from one state to another.
The example shows a repository with two files, README.md and the untracked ingore.txt. The README.md file has been edited and staged (green line) and then edited again (red line). Everything is happening on the master branch. The output nicely describes what needs to be done to move a file from one state to another.
So, if you are new to git or you already have some experience with a GUI, I would strongly recommend to start using the CLI. While it might look a bit scary at the beginning, you will be rewarded manifold later on.
Stay tuned for the next articles! You can signup below to be informed first things first about any news coming up.